Now coming to the popular perception; yes, knowing the camera is indeed one of the most important thing you should do to take good photographs. So let’s get started with the camera and the various facets to help us understand how pictures come as they do.
%27%20fill-opacity%3D%27.5%27%3E%3Cellipse%20fill%3D%22%23a5a5a5%22%20fill-opacity%3D%22.5%22%20rx%3D%221%22%20ry%3D%221%22%20transform%3D%22rotate(-111.2%2077.8%2021.6)%20scale(41.87683%2046.26586)%22%2F%3E%3Cellipse%20fill%3D%22%23aaa%22%20fill-opacity%3D%22.5%22%20rx%3D%221%22%20ry%3D%221%22%20transform%3D%22matrix(25.67893%2043.76867%20-21.6408%2012.69658%20210.2%2055.4)%22%2F%3E%3Cellipse%20fill%3D%22%23fff%22%20fill-opacity%3D%22.5%22%20rx%3D%221%22%20ry%3D%221%22%20transform%3D%22rotate(-165.5%2034.4%20102.5)%20scale(95.70168%2035.44104)%22%2F%3E%3Cellipse%20fill%3D%22%23fff%22%20fill-opacity%3D%22.5%22%20rx%3D%221%22%20ry%3D%221%22%20transform%3D%22matrix(4.3752%2035.40651%20-122.22686%2015.10364%2023.4%20.6)%22%2F%3E%3C%2Fg%3E%3C%2Fsvg%3E) The Camera
The Camera
According to Wikipedia, a camera is a device which takes and stores photographs. Starting with the simple pin hole camera in 1700s, this much loved device of ours has come a long way indeed. Today most of the photography has shifted to Digital Cameras with the DSLR sales showing a good growth rate.
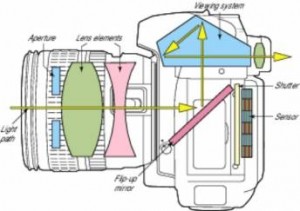
All cameras work in a similar fashion with just minor changes in the mechanism. Light falls on the subject and is reflected. This reflected light then passes through the camera lens and hits the film or sensor, thus making an imprint of the subject as it is ‘seen’ by the camera. This image is then saved either in the film or the memory card and is ready to use after post processing (not needed in Digital Cameras). Not going into the details of a camera, which can be found in the user manuals which came with your camera, in this article we will concentrate more on the following: Aperture, Shutter Speed, Focal Length and ISO. So let’s go one by one.
Aperture
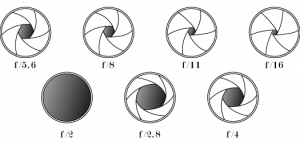
Think of your camera as a Human Eye, how does an eye see an image? Light comes through the eye lens, passes through pupil and falls on the retina. The pupil and iris change their shape according to the light available outside so as to create the right image of the object in front. When the light is abundant outside, the pupil contracts and lets only the required amount of light to get inside, similarly when there is not enough light around, the pupil dilates in order to allow as much light in as possible so as to render the a normal image. This pupil is the human form of the Aperture whose primary task is to control the amount of light which is coming inside the camera. So for a fixed Shutter speed (we are coming to that), you need to control the Aperture so as to control the light coming in. Usually in a camera, the aperture is defined by f stops (f1.4, f1.8, f2.8 … f22) denoting various stops of the aperture.
One more important aspect of Aperture is Depth of Field which needs an article dedicated to itself. Thou shalt have it soon. 🙂
%22%20transform%3D%22translate(.6%20.6)%20scale(1.17188)%22%20fill-opacity%3D%22.5%22%3E%3Cellipse%20fill%3D%22%23000004%22%20cx%3D%2264%22%20cy%3D%2285%22%20rx%3D%2259%22%20ry%3D%2269%22%2F%3E%3Cellipse%20fill%3D%22%23dbedf8%22%20cx%3D%22206%22%20cy%3D%22185%22%20rx%3D%22242%22%20ry%3D%2223%22%2F%3E%3Cellipse%20fill%3D%22%23d07532%22%20rx%3D%221%22%20ry%3D%221%22%20transform%3D%22matrix(69.95997%2037.03459%20-33.19997%2062.71621%20179.5%2098.1)%22%2F%3E%3Cellipse%20fill%3D%22%23762900%22%20cx%3D%22105%22%20cy%3D%22116%22%20rx%3D%2225%22%20ry%3D%2241%22%2F%3E%3C%2Fg%3E%3C%2Fsvg%3E) Shutter Speed
Shutter Speed
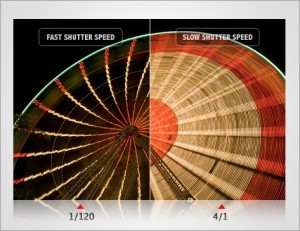
Shutter is like the door of the camera which decides for how much time the light (yes it is still all about light :P) is allowed to come inside. Think of the Shutter as the eye lids, the longer they keep open, the more will be the eye exposed to light. In case of the Sutter Speed, the faster it is, the lesser will be the time available for the light to hit the sensor / film.
Shutter speeds in a camera vary from 30 second to 1/4000 of a second, Bulb mode being an extra addition to most cameras. Fast shutter speeds are used to capture subjects in motion, like a moving car. Slow shutter speeds are used in low light scenarios when it is required that light continues to come inside the camera for an extended period of time. Slow shutter speeds can also create an impression of blur.
Coming to the Bulb Mode, it is like controlling the duration for which shutter has to be left open. An example will be Night photography, where shutter speed can be as high as 15 min (We will get there too). So one click opens the shutter and another closes it after desired duration. Using a remote release is very important if you are taking a photograph in this mode. We will learn more about it later.
Focal Length
Focal length is the distance of the lens from the film/sensor. The focal length of a lens determines the magnification at which it creates an image of a distant subject. It is here that the zoom lenses come into picture, although they are clearly outperformed by their telephoto cousins.
Focal length of a camera is usually specified in millimeters, a general camera kit lens will come typically in the range of 18-55mm. A lens with the focal length equal to the diagonal of the film/sensor size is know as the normal focal length. Normal focal length for a 35 mm sensor is usually 50mm. The lesser you go from the normal ie, 24mm, 18mm and so on, the more ‘wide angled’ your photograph becomes. The higher you go from the normal, ie, 105mm, 200mm, 400mm, the more will be telephoto ability, in a progressive crop however.
F Stop
F-stop is the focal length of the lens divided by its diameter. For example, for a 200mm lens with a diameter of 50 mm, the F stop will be f/4
Lenses are marked with a series of F-stops, each one letting in half as much light as the previous one. The light-gathering ability of a lens is determined by its area, and f-stops are determined by diameter. The series of f-stops 1, 1.4, 2, 2.8, 4, 5.6, 8, 11, 16, 22, 32 are powers of the square root of 2. Do not fear the mathematics; the knowledge will come only with practice. 🙂
ISO
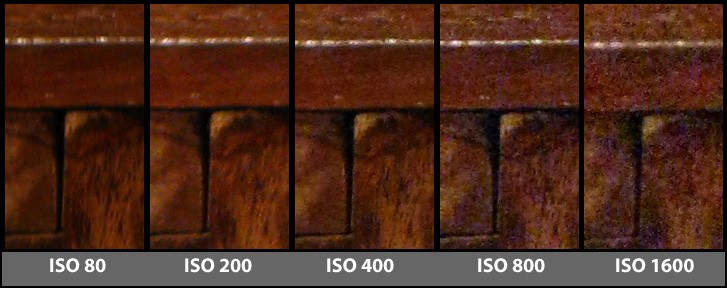
If you had been there in the film days, you may have seen films rolls with different ISO ratings. ISO used to be the light sensitivity of the film, the amount to which the film will react when light falls on it. Fast-forward to today, ISO denotes the light sensitivity of a camera sensor. Going by an example- In a basic DSLR, the ISO will vary from 100 to 3200. At 100, the sensor will be least sensitive to light and the pictures will come darker at the same lens and shutter settings when compared to the ISO being higher, say 400. When the light is low, the ISO needs to be increased so as to enable the camera to capture the picture. Sounds good, but here comes the catch. As the sensor gets more sensitive, it will capture more and more noise and hence at higher ISO (800 and above) you will see specks of light in the photograph which will effectively reduce the picture quality. So if the picture quality has to be maintained, the ISO should be kept low. Having said that, it’s always better to have a poor photograph than none at all, Especially for the proverbial ‘Kodak Moments’!
So we dealt with the basic technical aspects of a Camera in brief, we will be revisiting the other technical stuff like metering, white balance, flash etc in our coming articles, but for now it is time to move on to something which is more important. So in the next episode, lets talk about Composition. Meanwhile, you are free to give your opinions and throw questions.
Note: All pictures in this tutorial have been taken from the Internet as I was feeling too lazy to take them, stitch and upload on a rainy Friday evening. Thanks to the original photographers. Guys you rock! 🙂


I must admit here that I am one of those who has a camera, but has no clue as to how it works. Thanks for de-mystifying the camera for me. 🙂
In that case you are in the same position I was in when I bought my first camera about one year back. These articles will be a summary of all I have learnt in lat one year and will continue to learn in the coming years 🙂
magnificent examples altogether, you just gained a brand new fan. I can’t wait for your follow-up posts.
Great post!