Contrary to the general perception, its not the Camera but the Light which needs to be understood as the first prerequisit for taking good photographs. Light is perhaps the most vital element of photography as it is the primary component needed to make photographs. This makes understanding light the first lesson in photography. This is one of the first lessons why you would learn in an online photography school.
%22%20transform%3D%22translate(.6%20.6)%20scale(1.28906)%22%20fill-opacity%3D%22.5%22%3E%3Cellipse%20fill%3D%22%23b8bfc6%22%20rx%3D%221%22%20ry%3D%221%22%20transform%3D%22rotate(63.4%20-5.2%2082)%20scale(47.36798%20145.95879)%22%2F%3E%3Cellipse%20fill%3D%22%23160000%22%20cx%3D%22186%22%20cy%3D%22177%22%20rx%3D%22217%22%20ry%3D%2261%22%2F%3E%3Cellipse%20fill%3D%22%238b3a00%22%20cx%3D%22223%22%20cy%3D%22150%22%20rx%3D%2258%22%20ry%3D%2258%22%2F%3E%3Cpath%20fill%3D%22%23000003%22%20d%3D%22M-16%20176l147-72%2032%2089z%22%2F%3E%3C%2Fg%3E%3C%2Fsvg%3E) Observe the Light It goes without saying that you must be able to observe light and how will it affect the photograph. You need to know whether enough light is coming on the subject and whether it will be the correct amount and correct form of light that you want in your picture. Start observing different forms of lights and see how do they affect the way the subjects look. You can also notice how light changes throughout the day and how do the same subjects appear different at different times of the day.
Observe the Light It goes without saying that you must be able to observe light and how will it affect the photograph. You need to know whether enough light is coming on the subject and whether it will be the correct amount and correct form of light that you want in your picture. Start observing different forms of lights and see how do they affect the way the subjects look. You can also notice how light changes throughout the day and how do the same subjects appear different at different times of the day.
Understanding Exposure Exposure is the degree to which the film or sensor of the camera allows the light to come on it. Exposure depends on various factors like the Shutter Speed, Aperture and ISO settings of the camera. To measure the exposure quantitatively, you can look at it on the Light meter available in the camera where neutral denotes the apparently correct amount by which the photograph will be exposed. However, as you understand light better and get creative, you will need to manipulate the exposure to suit the way you want to make the photograph.
Types of Exposure:
- Underexposed
- Optimally Exposed
- Overexposed
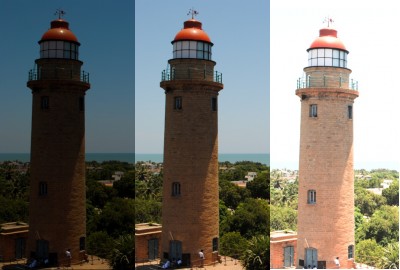
Underexposed simply means that not enough light which is present outside is reaching the camera film or sensor. So the photograph will come darker than what it looks to the actual light, the dark tones will become darker and the blacks will have prominence. Underexposed photos may make beautiful silhouettes especially when capturing sunsets and sunrises, however if the Exposure is too less, it will cause loss of detail due to blacked out regions. Deliberately underexposed photographs can be very creative !
Optimally Exposed is the situation when the photograph is exposed in such a way that the light in the photograph is exactly same as the light on the subject. This makes the photograph technically correct and is usually what we get in the Auto Mode of a camera. However, being optimum makes us only technically correct, not necessarily beautiful. So we need to be fairly creative in order to graduate from optimally exposed to beautifully exposed. The key to this, again is, observing light.
Overexposed is the time when the light coming on the film or sensor is much more than what was actually falling on the subject and getting reflected towards the camera. This leads to washed out effect which the prominence of whites and can again lead to loss of detail. However, photographs can be deliberately overexposed in a controlled manner to create wonderful effects. The skill to do this comes very handy especially when taking portraits and photographs of children, flowers etc.
%22%20transform%3D%22translate(.5%20.5)%22%20fill-opacity%3D%22.5%22%3E%3Cellipse%20fill%3D%22%23a4a4a4%22%20rx%3D%221%22%20ry%3D%221%22%20transform%3D%22matrix(26.87362%2024.88168%20-25.02055%2027.0236%20116.7%2037)%22%2F%3E%3Cellipse%20fill%3D%22%23fff%22%20rx%3D%221%22%20ry%3D%221%22%20transform%3D%22rotate(80.3%2054.5%20173.2)%20scale(23.63659%2071.8738)%22%2F%3E%3Cellipse%20fill%3D%22%23fff%22%20rx%3D%221%22%20ry%3D%221%22%20transform%3D%22matrix(-7.19864%2029.39965%20-55.98779%20-13.70887%2025.7%2096.5)%22%2F%3E%3Cellipse%20fill%3D%22%23fff%22%20cx%3D%22223%22%20cy%3D%22101%22%20rx%3D%2273%22%20ry%3D%2230%22%2F%3E%3C%2Fg%3E%3C%2Fsvg%3E)
%27%20fill-opacity%3D%27.5%27%3E%3Cellipse%20fill%3D%22%23fff%22%20fill-opacity%3D%22.5%22%20rx%3D%221%22%20ry%3D%221%22%20transform%3D%22rotate(-114%20187.8%20-84.7)%20scale(137.81854%20123.85347)%22%2F%3E%3Cellipse%20fill-opacity%3D%22.5%22%20rx%3D%221%22%20ry%3D%221%22%20transform%3D%22rotate(47.9%20-161.8%20121.9)%20scale(355.95831%20124.16652)%22%2F%3E%3Cellipse%20fill%3D%22%23fff%22%20fill-opacity%3D%22.5%22%20rx%3D%221%22%20ry%3D%221%22%20transform%3D%22rotate(-127.2%20190.6%20-66.6)%20scale(143.79839%2061.84734)%22%2F%3E%3Cellipse%20fill%3D%22%23d8c053%22%20fill-opacity%3D%22.5%22%20rx%3D%221%22%20ry%3D%221%22%20transform%3D%22matrix(-50.49473%2051.38381%20-63.96603%20-62.85925%20354.4%20240)%22%2F%3E%3C%2Fg%3E%3C%2Fsvg%3E)
Under-Optimal-Over Exposure
Types of Light:
- Direct Light
- Defused Light
Direct Light is the readily available light available from natural and artificial sources like the sun, streetlight, flash light etc, which falls on the subject and is reflected back to the camera. Both the amount and the direction of light falling on the subject are very important. If the amount of light cannot be controlled, care must be taken to control the direction as it significantly affects the way the subject looks and comes in the photographs. The light may come directly from the front or from an angle or the subject may even be back-lit, every angle will present a different story of the subject. More on this in the coming articles.
Defused Light is non-directional, flat and fairly neutral. An example can be the sunlight on an overcast day when the clouds take away most of the strength of the sunlight. Defused light gives an excellent opportunity to photograph people as there is an overall softness visible because of the light itself being soft. This brings out the best of facial expressions and features in the people. When the sunlight is too harsh, it can be diffused using shades etc.
In the coming advanced sections, we will go through different kind of light conditions, angles etc and how to best utilized them for the photography, please let me know if you have any questions or suggestions about this post and the related content.
 Observe the Light It goes without saying that you must be able to observe light and how will it affect the photograph. You need to know whether enough light is coming on the subject and whether it will be the correct amount and correct form of light that you want in your picture. Start observing different forms of lights and see how do they affect the way the subjects look. You can also notice how light changes throughout the day and how do the same subjects appear different at different times of the day.


Very wonderful light tips there 🙂 Enjoyed reading em.
Please see my posts :
Haircules Speaketh!
Love is two way
Please vote for them if you find them interesting.
Keep Blogging 🙂
This is great & simple to follow !!
I am gonna buy a camera ,hopefully soon 🙂 Meanwhile exploring ur pics !
Thanks Vaishali, do not delay, buy one soon ! Before Lonavala 😀
It’s indeed a great post.
Thanks a lot for tutorial. 🙂
Thanks Pranav 🙂
Too good I liked it a lot, pls keep writing