Now we come to a topic we have been promising to discuss for a very long time- Depth of Field. It is the range of distance in the photograph which appears in focus, ie, reasonably sharp. The Depth of field depends on several factors like aperture, focusing distance, the type of lens being used etc.
Circle of Confusion
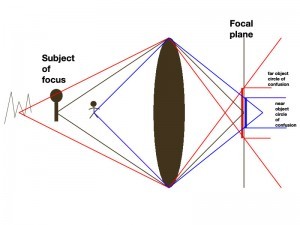
Circle of confusion is an important concept if Depth of Field is to be understood properly. There is no precise point of transition where the Depth of Field changes, the process being gradual, the circle of confusion defines the limit to which the subject needs to be unsharpened in order to be considered blur. The subject is said to be lying beyond the depth of field if it is no longer, or as a corollary, objects lying outside the depth of field will not appear sharp to the eyes.
As you see in the diagram on the left, only the image of Subject of focus falls on the Focal plane and is hence detected sharp by the sensor. The far and near objects lie before and beyond the focal plane and hence, are not sharp.
Controlling Depth of Field
Aperture and Focal length are the two prime factors which decide how large the circle of confusion is and how much is the depth of field.
The two rules will thus translate into:
1. The larger the aperture, the shallower is the depth of field
2. The longer the focal length close focusing on the subject, the shallower is the depth of field
To get the desired results, these two rules need to juggled together in a balanced manner. The depth of field also depends on the distance of the subject from the camera and the distance of the background from the object. To simplify, the nearer is the subject from the camera and the farther is the background from the subject, the shallower is the depth of field. In case of a shallow depth of field, only a limited focal plane will be in focus and all other will be out of focus.
What will be considered a shallow depth of field?
F1.4, F1.8, F2.8, F3.5 .. F5.6 is the range of F stops in which you may hope to achieve a shallow depth of field, the shallowest at F1.4 and increasing henceforth. As you increase the F stops after this point, the depth of field will keep increasing.
Putting Depth of Field into use:
Portrait Photography
Now let’s see what Depth of field is all about. Have you seen portraits where the subject is in sharp contrast with the out of focus blurred? That’s where the shallow depth of field has been put to practice. Usually photographers tend to keep it shallow to accentuate the beauty of the portraits.
In the photograph at the left, the depth of field was very shallow as the Aperture was set to 2.8. As a result we can see that only the face of the subject, which is much closer to the camera, comes sharp and the background is almost illegible. Not many people will dislike such portraits unless the background was really important.
Landscape Photography
However, we cannot say the same about Landscape photography. How would you feel when you see a landscape photograph in which only the trees in foreground are in focus, and the valley beyond and the mountain in the background are just a mishmash of blurred hues? I won’t feel very happy with it.
So if you want a clear tree, a clear valley and a clear mountain, the depth of field has to be deep enough to allow all that, unless you are trying to be creative. So what do you do? Lower the Aperture and then shoot. But again, creativity may be very demanding at times.
Selective Sharpness
Sometimes it’s not just the background and foreground, it may happen that you may want to keep only a part of the frame with a ranged focal plane in focus and blur the rest. This is what people do sometimes in a Macro photography. In that case you will need to have a point focus and that object and increase the aperture to create a shallow depth of field to get that effect.
As the photograph in the left shows, both the foreground and the background are blurred and only the middle is what lies on the focal plane, hence the effect.
So thats all for Depth of Field for now, I will be updating this article time and now. To see Depth of Field at work, you can click at this Flickr link. To know more about Depth of Field, click here.


Very useful and easy to understand explanation. For people entering photography with digital point and shoots, tips like these are essential to learn the basics of photography. Thanks for sharing, and will be looking out for more.
Thanks for the information about Depth of Field. It was very helpful for those who are learning photography..
You are welcome Abhinav 🙂
Nice tips …….
Thanks Dhiraj