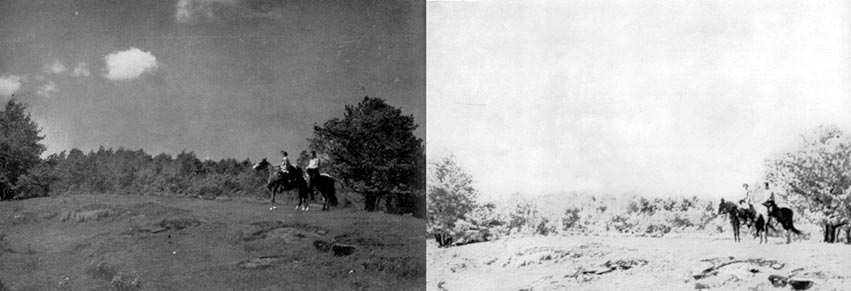
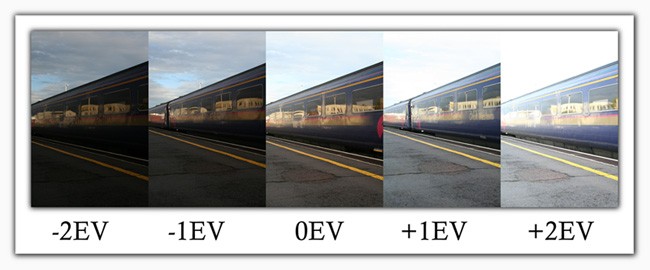
This post was long due; although I always felt that Exposure needed a special place for itself, yet was not sure on what and how much detail should be given for this. But now I am certain that understanding exposure is so important in photography that a separate section should be dedicated to it. So without further delay, lets start.
What is Exposure?
Exposure is the amount of light that is falling on the sensor or film of a camera during the time the shutter remains open. Exposure is measured in Lux Second. From this definition it is apparent that Exposure has two principle factors – light and duration. Since light depends on the aperture, we can also conclude that aperture and shutter speed are two primary parameters in a Camera which define the exposure of a photograph. We will use this information later in the article.
Overexposure and Underexposure
A photograph is called Overexposed when the amount of light which fell on the sensor/ film was more than optimal. An overexposed photograph has a washed out look and there is an excess of white. Due to this, there is a loss of detail in relatively more lighted sections of the photograph.
On the other hand, if the amount of light is not enough, the photograph is darker than necessary. The black regions are prominent and there is a loss of detail in the darkened sections of the photograph.
At this juncture, I would like to clarify that, photography being more a creative activity, there can not be an optimal exposure. Photographers experiment with different levels of exposure to create the photographs they have visualized. One may only try to preserve as much of the detail while fulfilling the creative and ascetic goal of creating the photograph.
Exposure Control in modern Cameras
Shutter Speed: Shutter speed determines the amount of time by which the shutter of the camera will remain open to allow light inside. Thus the longer or slower is the shutter speed, more is the amount of light coming in and hence higher is the exposure. To know more about Shutter speeds, please read an earlier article here.
Aperture: Aperuture determines to which the ‘eye’ of the camera opens up. Hence the amount of light striking the sensor is directly proportional to the degree to which the aperture is open. Aperture is measured in F stops, F/1.4, F/1.8, F/2.4 denoting an aperture wide open and F/11, F/22 being very slighty open. To know more about Shutter speeds, please read an earlier article here.
ISO: Like the photofilms in the past, modern cameras have the ability to control the sensitivity of the sensor towards light. Hence, if the ISO is low, the camera sensor is less sensitive and thus needs more light to create the image of the same exposure that a higher ISO will creater with lesser light. ISO is measured as ISO100, 200, 400 and so on, 100 being least sensitive and the higher being more sensitive.
How to control Exposure by combining the various Parameters ?
We can achieve the desired exposure by combining the above three parameters in different ways. Lets consider the following as an illustration:
Sunny 16 Rule: On a bright sunny day, an approximately correct exposure can be obtained by keeping the shutter speed at 1/100 s, aperture at F/16 and ISO at 100. Or, a shutter speed of 1/1600 s, aperture at F/16 and ISO 200.
Note how the shutter speed needs to be raised when the ISO is raised to make the sensor more sensitive to light. If the shutter speed is not raised along with the ISO, the light will continue to fall on the now more sensitive sensor than what is required.
Similarly, if the shutter speed is constant and the ISO is raised, we would need to reduce the aperture and reduce the amount of light entering the camera to account for a more sensitive sensor.
If the ISO is held constant and the shutter speed is increased, the aperture needs to be opened further so that more amount of light enters the camera and falls on the sensor even if it is for a reduced period.
A time tested way to get approximately correct exposure for a normal photograph is to set the Shutter speed to the reciprocal of ISO number under the following conditions:
Aperture | Lighting Conditions | Shadow Detail |
| f/22 | Snow/Sand | Dark with sharp edges |
| f/16 | Sunny | Distinct |
| f/11 | Slight Overcast | Soft around edges |
| f/8 | Overcast | Barely visible |
| f/5.6 | Heavy Overcast | No shadows |
| f/4 | Open Shade/Sunset | No shadows |
| Add One Stop | Backlighting | n/a |
Automatic Exposure Control
Modern cameras provide Automatic and Semiautomatic Exposure controls in the Auto and Aperture Priority/Shutter Priority (or Av/Tv) modes respectively. So if you are working on an Auto or Semi Auto mode, the camera takes care of almost all the Exposure related stuff, almost. A camera is just a machine – it doesn’t make the photograph, you do. And the final outcome which comes out from an auto mode may not be the one you had in mind when you pressed the shutter. Therefore, there are still some ways to make adjustments even when you are in an auto mode.
Metering: Metering is the way in which Camera measures the light available and determines the exposure. Cameras today come with different metering settings to enable the camera estimate the exposure required as per the surroundings and user selection. Metering is of many types, as named below.
- Spot Metering – Measues only a small area, usually 1-5% of the frame. Is normally centered but can be user adjusted. Used in high contrasts.
- Partial Metering – Measures a bigger area than Spot Metering, about 10% of the frame.
- Center Weighted Metering – Measures between 60 to 80% of the sensitivity towards the central part of the frame less at the edges.
- Average Metering – Takes an average of the light available across the frame and thus determines the exposure.
Exposure Compensation: Exposure Compensation is a feature in modern DSLRs which allows the user to tweak the exposure when the camera is in an auto or semi auto mode. Hence, even if the camera is calculating the exposure by itself, the user can still control it to some degree. A negative exposure compensation will make the photograph darker than it would have been with a camera on auto mode with zero compensation. A positive exposure compensation, on the other hand, makes the photograph brighter. Exposure compensation is used when there are chances that the camera may not be calculate the correct exposure by itself and needs adjustment.
Photography in snow: An example of a scenario where exposure compensation is required is when you are taking photographs in snow. Since there is white all around, the camera light meter mistakes it for more light and left to itself, underexposes the photograph. So if you take a photograph of snow in automatic mode, the photograph will be darker. Therefore, the exposure compensation needs to be pushed up a few stops (ex +.7) to take the correctly exposed photograph.
So this is what I could think about Exposure in Photography. Do let me know if it has come out well, I will keep updating this article as I learn more. Would love to hear from you about your thoughts and experiences.


Thank you so much for the detailed explanations! I always get flummoxed when I have ever tried using the manual settings on my camera!
Thanks Richa. I hope this answers some of your questions now 🙂
great post – i recently covered Exposure too on my blog.. this is well done. you and i seem to be covering the same sort of topics!
Thanks Dude! I checked your great blog and yes, we seem to be on the same track 🙂